| 일 | 월 | 화 | 수 | 목 | 금 | 토 |
|---|---|---|---|---|---|---|
| 1 | 2 | 3 | 4 | 5 | ||
| 6 | 7 | 8 | 9 | 10 | 11 | 12 |
| 13 | 14 | 15 | 16 | 17 | 18 | 19 |
| 20 | 21 | 22 | 23 | 24 | 25 | 26 |
| 27 | 28 | 29 | 30 | 31 |
- Kotlin
- 깃헙
- 안드로이드스튜디오
- 안드로이드
- Github
- 스튜디오
- WebView
- 에러
- image
- 레트로핏
- coroutine
- build
- error
- Gradle
- 유튜브
- 웹뷰
- 의존성주입
- ADB
- MVVM
- 코루틴
- youtube
- RecyclerView
- 코틀린
- Retrofit
- viewpager
- 안스
- flow
- 안드로이드 스튜디오
- Android
- studio
- Today
- Total
코딩하는 일용직 노동자
FCM data & notification 처리에 관하여.. 본문

#1. Data만 보내는 경우
{
    "data":{
        "title": "data title text",
        "body": "data body text",
        "link": "http://m.naver.com"
    }
}
Normal Priority를 기본으로 가지며 모바일 기기가 Doze 모드이거나 혹은 절전모드에 있을때 처리를 미루게 된다.
#2. Notification만 보내는 경우
{
    "notification": {
        "title": "notification title text",
        "body": "notification body text",
        "link": "http://m.naver.com"
   }
}
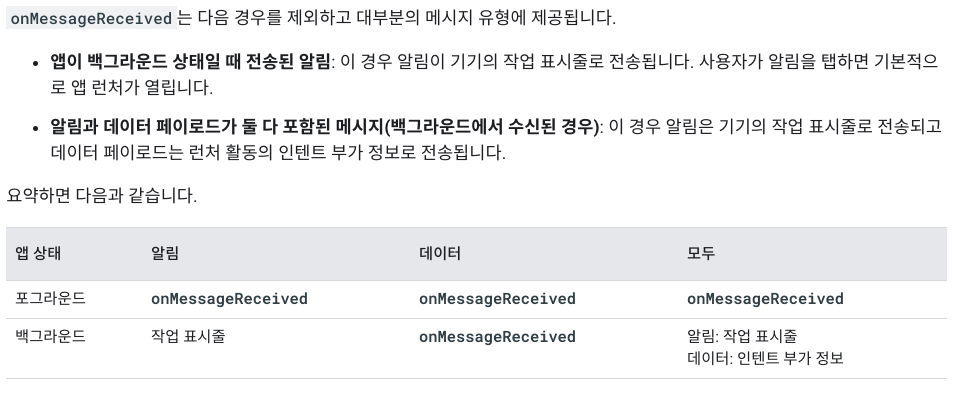
Foreground 상태에선 onMessageReceived를 통해 전달된다.
High Priority를 가지며 디바이스가 Doze 모드거나, 앱이 Background 상태거나, Killed 상태여도 시스템 트레이를 통하여 Notification 이 전달된다.
#3. Data & Notification를 보내는 경우
{
    "data":{
        "title": "data title text",
        "body": "data body text",
        "link": "http://m.naver.com"
    },
    "notification": {
        "title": "notification title text",
        "body": "notification body text",
        "link": "http://m.naver.com"
   }
}
앱이 Background 상태거나, Killed 상태 일때는, Notification 이 시스템 트레이를 통해 기기에 표시되고, onMessageReceived를 통해 Data는 전달 되지 않는다.
그래서 앱이 Background 상태거나, Killed 상태에서 Data & Notification Push 일 경우에는 Data 처리는 할 수 없다.
위에 설명한 내용은 여기에 잘 정리되어 있다.

https://firebase.google.com/docs/cloud-messaging/android/receive?hl=ko
Android 앱에서 메시지 수신 | Firebase
Firebase 알림의 동작은 수신하는 앱의 포그라운드/백그라운드 상태에 따라 달라집니다. 포그라운드 상태인 앱에서 알림 메시지 또는 데이터 메시지를 수신하려면 onMessageReceived 콜백을 처리하는
firebase.google.com
#4. Notification Push 클릭시 특정앱이 실행되게 하는방법.
Notification Push 를 클릭하면 기본적으로는 기본실행으로 지정된 액티비티가 실행되게 된다.
<intent-filter>
    <action android:name="android.intent.action.MAIN" />
    <category android:name="android.intent.category.LAUNCHER" />
</intent-filter>
만약 별도의 액티비티가 실행되게 하고 싶다면 "click_action"을 추가해주면 된다.
FCM 에서 아래처럼 발송하면 된다.
{
    "notification": {
        "title": "notification title text",
        "body": "notification body text",
        "link": "http://m.naver.com",
        "click_action": "FCM_EXE_ACTIVITY"
   }
}
매니페스트 파일에선 아래처럼 원하는 액티비티에 intent-filter 를 추가해준다.
<activity
    android:name=".NotificationHubActivity"
    android:launchMode="singleTask">
    <intent-filter>
        <action android:name="FCM_EXE_ACTIVITY" />

        <category android:name="android.intent.category.DEFAULT" />
    </intent-filter>
</activity>
'안드로이드' 카테고리의 다른 글
| ViewBinding 이용하기 (0) | 2021.03.13 |
|---|---|
| Lint found fatal errors while assembling a release target. 에러 해결 (0) | 2021.03.04 |
| NotificationBadge 라이브러리 소개 (0) | 2021.02.22 |
| Admob 에러 관련 처리. (0) | 2021.02.07 |
| 안드로이드 스튜디오 로그캣 색상 바꾸기 (0) | 2021.01.31 |


